Not What They Seem - Postal History Sunday
Welcome to my version of Halloween for Postal History Sunday on the Genuine Faux Farm blog and cross-posted on the GFF Postal History blog!
I see you with your Trick or Treat bag. Since I don't have any candy for you, you'll just have to accept the gift of a blog that features something I enjoy - postal history! Grab yourself something to drink and pull out your favorite treat that you've already collected form other houses. Or, if you celebrate Dia de los Muertos, consider that one of the things we do here is visit the past and the lives our ancestors by exploring the items that once carried communications between them.
Either way, I welcome you and I hope you enjoy what follows.
--------------
The ugly and occasionally scary side of hobbies like postal history is that sometimes items are offered to collectors that are not what they seem to be. Paintings have their forgers, rare wines are faked and even designer handbags have sites that tell you how to tell the real from the fake.
There are individuals who have manipulated and modified pieces of postal history so they look like something that is better than they are. The hope, of course, is that someone will pay much more than the item was worth. There are also pieces of postal history that have succumbed to the ravages of time. They may look like one thing, but be another simply because the whole story is no longer visible. In this case, no one purposely altered the cover to make it more valuable, but a collector might still purchase it thinking they are getting something that they aren't!
Let's take a quick trip to the scary side of postal history.
Entering the Wading Pool
Sometimes it makes sense to get into the wading pool first, because the sharks like the deeper water.
Over the last several years, I have been attempting to learn more about mail between Western European nations in the period from 1850 to 1875. One of the risks of expanding into a new collecting area is that it is more likely that you will not immediately recognize a good item from one that is... well... not so good (or one that is VERY good).
This is why I set ground rules for myself that reduce the risk and help me to build up the best defenses for any collector - knowledge and experience.
The first rule is to familiarize myself with the most common items from that region and period of time. Simply looking at, without buying, images of covers can train my eye to what is normal - and what is not. Then, if I like what I have been seeing, I can safely add some of the more common uses, that fit all of the normal characteristics, to my collection.
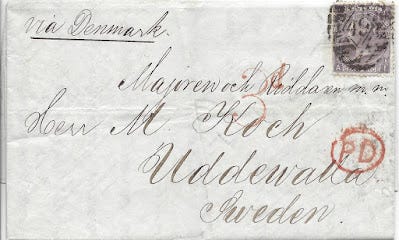
The folded letter above is a good example of a cover that represents what most existing artifactsfrom the United Kingdom to Sweden in the 1860s look like. A six penny stamp pays for the single rate of postage. A "PD" marking indicates that the British post counted it as fully paid and a "3d" marking indicated how much of that postage was passed on to Denmark for their share.
After seeing several examples that had the same characteristics, it felt safe to say that this one would be a good example of the postal rate and route.
The second rule is to place a strict limit on how much I will pay for any item until I feel I have gained sufficient expertise to "splurge" on something.
I find this to be a useful approach because I learn rapidly what standard mails for this period look like. As a result, I am now much better at recognizing when a cover is different. And, when it is different it may be for one of the following reasons:
It might be illustrating a different aspect of mail handling for the time that could be very interesting.
Something is "not right" with an item.
The problem? I am not always certain which of these two things I am observing!
Was One Shilling Enough?
Here is an example of case #2 - something is not right.
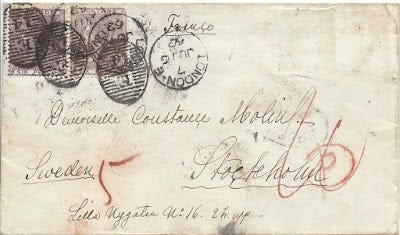
This envelope went from the United Kingdom to Sweden in 1862. The are two six-pence stamps that are heavily post-marked. So, my first thought was that it could be an example of a double rate letter - just a heavier version of the first example in this blog post.
But, there were numerous differences in the markings - and the back gave me even more information to tell me that I was not seeing a simple double rate for a letter similar to the first one.
So why did I buy this if it was not consistent with the first item? Well, that was EXACTLY why I was interested. It was different! And, the markings all "agreed" with each other, showing a fairly clear set of travels. Most of it felt right to me, but I did not, at the time I added this to the collection, know all of the postage rate options between the British and Swedish post office. So, I took a gamble at low cost - and I actually still think I won because I learned so much!
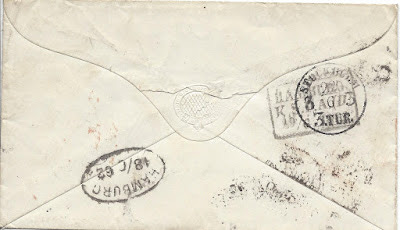
Verso of the cover above.
What is this item supposed to be?
The piece of letter mail shown above was mailed in London on June 16, 1862 and arrived in Stockholm, Sweden on June 22 of the same year. The front of the cover shows markings for London and a very faint marking just under the stamps that is likely Helsingborg (June 20). The back shows markings for Hamburg's mail office on June 18 (the oval) and the Swedish mail office (rectangle). It is possible some of the blurred markings are the Royal Danish mail service markings. And, finally, there is a receiving mark in Stockholm on June 22 (circular marking over the rectangular marking).
The route for this mail, starting in London, shows the letter crossing the channel to Ostende, Belgium. Belgian railways carried the item across the country so it could enter Prussia at Aachen. Prussian railways carried this item to Hamburg.

The Hamburg mail service received the item and then transfered it to the Danish mail office in Hamburg. They, in turn passed the letter on to the Royal Swedish post office in Hamburg. The Swedish post then sent the mail via Danish rail services to Helsingor. From there, crossing the Oresund to Helsingborg (Sweden). At that point, the letter likely went overland to Stockholm.
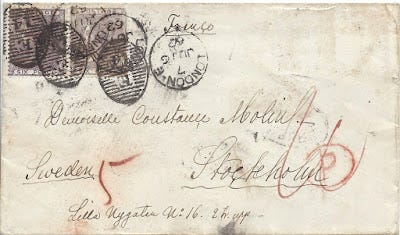
Here is the front of this letter yet again. Warning! We're about to get into the weeds a bit here!
The "P" in an oval is a British marking indicating the item was prepaid to the destination. There is a red "10" that looks a bit like a "W" over the spot where the "P" in the oval resides. And there is a red "5" at the lower left. What did these numbers mean?
10 pence were passed on to the Hamburg mail service.
Hamburg passed 5 silbergroschen (about 6 pence) to the Scandinavian posts
Hamburg kept 3 1/2 pence
Hamburg gave 1/2 penny to the Belgians for their transport
4 pence in postage were kept by the British
they passed an additional 1/2 penny to the Belgians as well.
Ok, back out of the weeds. I told you all of that so I could say this:
The total postage was 14 pence (1 shilling and 2 pence). And there are 12 pence (1 shilling) in postage on this envelope.
Hmmmmmmmm.
To make a long story a little shorter, this is a genuine example of the 1 shilling 2 pence rate to Sweden. But, there appear to be two one penny stamps missing that were once located at the top right.
Alas. And, yet - look at how smart I sound now! Maybe I should not have told you I bought it without knowing the rate of postage in the first place. I could have come across as sounding very wise if I told you I noticed this item and immediately could tell there was a problem.
Well, probably not. But, one can hope.
What were the warning signs?
1. The postage is underpaid, but it appears to have markings for a paid item.
This is why it is important for a postal historian to have knowledge of postal rates.
The British rate for prepaid mail via the Belgium to Hamburg route was 1 shilling 2 pence for every half ounce of weight. This was the normal route for mail to Stockholm from August 1 of 1852 until Dec 31, 1862. The first letter shown in this blog shows the rate AFTER 1862!
When you find an item that clearly has too little postage to cover the postage rate and it was still treated as unpaid, you have a few options:
the postal clerk made an error
the sender paid for the remaining amount in cash and the clerk opted to not put stamps on it (maybe they were in a rush to get it into the mail stream)
at one time, there was enough stamps to pay the postage, but they have fallen off.
2. There are shadows at the upper right that are the right size and shape for 2 additional stamps.
Water activated adhesives on these stamps could release if exposed to moisture over time (it is over 150 years old, you know). It is also possible that the stamps were never very well attached, coming off at some point even as it traveled through the mails - we'll never know for certain.

To help you see what I am talking about, I enhanced some of the area at the top right of the cover. You can see what appears to be the shadow of the edge of a perforated postage stamp where the arrow is pointing in the image above.
Conclusion
This is a genuine cover with no intentional modifications made. However, two stamps have fallen off at some point after it was processed as a paid item.
My mistake was not being certain of the rate for a prepaid item via this route to Sweden. I was much more familiar with the rate structure from 1865 to 1875. I took a shot with a guess and I was wrong.
Live and learn!
Experience Pays Off
The second part of this "horror show" illustrates an item that someone "improved" at some point in time. I was considering adding this cover to my collection several years ago, until it became apparent there was a problem.
My interest in this piece of letter mail from the United States to Belgium was in the fact that it was forwarded on to Cherbourg, France after getting to its original destination in Antwerp.
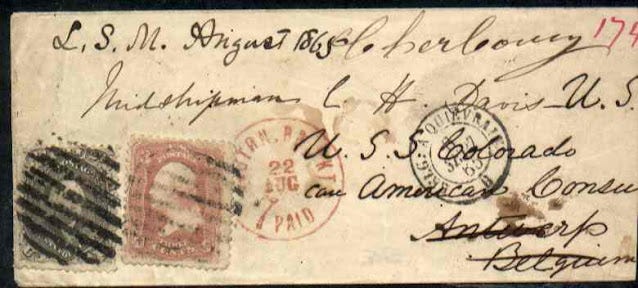
I was also attracted to this cover because its travels were so easy to follow. Postal transit markings on the front and back clearly trace the cover's route from Boston, England, Antwerp, Paris and Cherbourg. The cover was clearly to an individual on ship (the USS Colorado), which explains the bit of a "merry chase" so the letter could catch up to Midshipman C.H. Davis. The 27 cents in postage was correct for such an item from the US to Belgium, as are the markings.
What were the warning signs?
Cutting right to the chase - we should all look closely at the 3 cent stamp on this cover (it is the rose/red colored stamp - the other is a 24 cent stamp).
1. Strong Boston transit marking does not tie to the stamp
In postal history, we often talk about how postal markings "tie" a stamp or label to a cover. Simply put, if the stamp was on the cover when it was mailed, and the Boston postal clerk struck this letter with the Boston postal marking in red ink, it should appear both on the envelope AND the stamp. When that happens, we say that the stamp is "tied" to the envelope because the markings around it are consistent between the two.
In this case, there isn't ANY trace of this red marking on the 3 cent stamp.
There was clearly enough red ink on the stamping device because the marking on the envelope is very clear and strong. The odds are very low that the stamp would get NO ink on it from this marking.
2. Different cancellations on the two stamps.
Postal services used cancellation devices to deface postage stamps so they could not be re-used. In this case, a circular handstamp of nine bars was used to apply black ink to the 24 cent stamp. The 3-cent stamp also has nine bars on its cancellation, but it has a slightly different shape.
The orientation of the cancels is slightly different, but not enough to cause great concern. However, the width of the bars is definitely different. The right grid cancel gives more of an appearance of a 'rim' - or a more definite termination to the bars than the left cancel. The dark cancellation on the left stamp makes it seem odd that the right strike should be so light - except for the ink that is actually on the envelope.
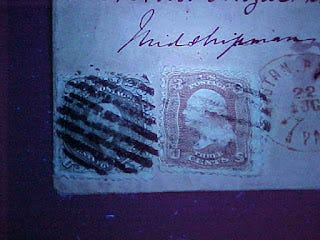
Blacklight image of lower left
And, if you look even more carefully - it appears that someone used some black ink to extend the bars on the 3 cent stamp so they could match up with some markings that were on the cover.
3. Cancellation ink from the left cancellation goes under the perforations on the 3 cent stamp.
Some of the longer bars on the first cancellation should touch the 3 cent stamp. As a matter of fact, they should "tie" to the 3 cent stamp. Instead, some of the cancellation ink goes UNDERNEATH the 3rd perforation from the bottom on the left of the 3 cent stamp.
Unfortunately, I cannot illustrate this very well, but it became obvious when I viewed the item in person.
4. Aging shadow inconsistent with orientation of the 3 cent stamp.
This is another thing that is hard to show on a blog. But, as a piece of postal history ages, evidence that there once was something on the envelope but is no longer there shows up. Just like the British item that was missing two stamps, there is a bit of shadowing that shows us there was another stamp on this cover - and it is NOT the 3 cent stamp we see here.
5. Liquid staining in the area of the transit mark not apparent on stamp.
This envelope got wet at some point in time - with staining right about where the 3 cent stamp resides. Yet, the 3 cent stamp doesn't show that staining. In fact, it is possible the original stamp came off when the cover got wet.
Conclusion
This is a genuine cover with a replacement 3 cent stamp for the stamp that was lost at some point in the cover's lifetime. The person who modified this cover carefully placed a decent candidate 3 cent stamp with a grid cancellation on the cover and it looks like they may have added a little ink to persuade us to think it was "tied" to the cover. I am fairly confident the 24 cent stamp did originate on the cover.
--------------------------
Thank you again for joining me for Postal History Sunday. I hope you enjoyed a slightly different look at the hobby I appreciate.
Have a great remainder of your day and a good week to come.


